Choosing China’s top lights for seamless studio background lighting requires more than comparing wattage and price. Small studios expose every weakness: a bright hotspot behind the subject, gray corners, visible wall texture, or flicker during slow-motion recording. This guide examines how to achieve seamless background lighting in a small studio through beam control, diffusion, color consistency, and measured output. It focuses on practical setups, including COB LED fixtures, softboxes, lanterns, grids, and dimmable bi-color units from leading Chinese manufacturers.
Professional standards support this approach. The U.S. Department of Energy’s Solid-State Lighting research reports emphasize efficacy, controllability, and color quality as key LED performance factors. CIE and IES guidance also encourages evaluating color fidelity beyond basic CRI. TM-30 measurements can reveal hue shifts that a CRI 95 label may hide. Flicker matters too. IEEE 1789 connects modulation depth and frequency with potential visual risks, especially for cameras and high-speed capture. These reports do not make every specification equally useful.
Look closely at the details.
A reliable fixture should produce even illumination across the background, not merely strong central brightness. In a compact room, start with the light 45 degrees above the background and angle it slightly downward. Add diffusion, then measure the corners with a light meter. A two-stop difference may remain visible on camera. Sometimes, imperfect wall paint causes the real problem. Better lighting cannot completely repair uneven surfaces, although careful exposure and distance can reduce the effect. This article compares beam angles, fan noise, thermal control, app reliability, and real-world color stability, helping creators select equipment with evidence rather than attractive marketing language.
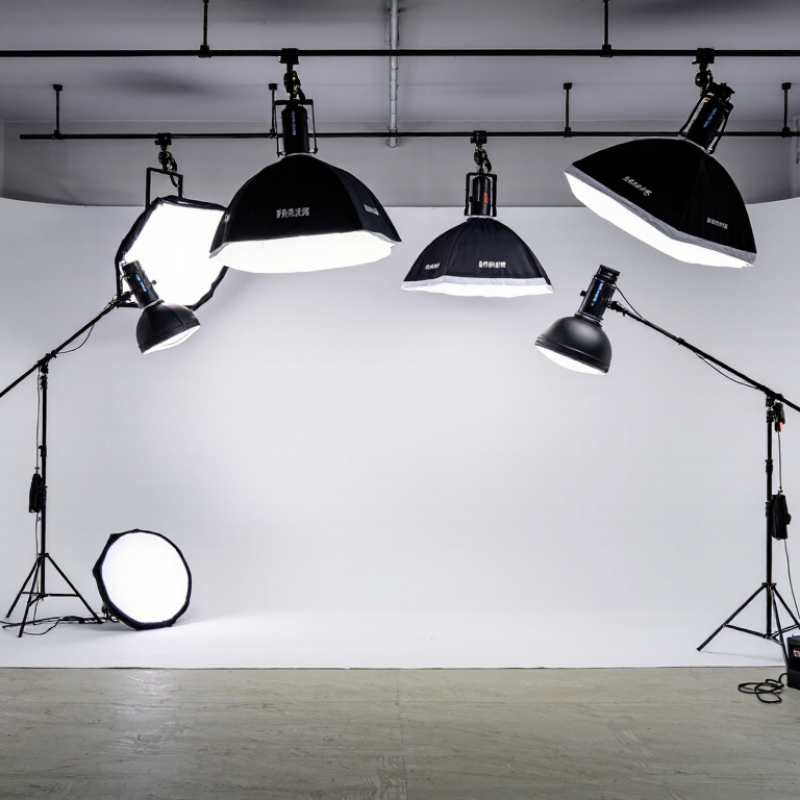
A seamless background needs even illumination, not simply a powerful fixture. Light should reach the paper or cyclorama consistently from edge to edge, with no bright center, dark corners, or visible bands. In practice, measure several points across the backdrop and compare them; a camera preview alone can hide subtle variation. Distance, beam spread, and fixture angle all affect the result. Small adjustments matter.
Color quality matters too. The European Broadcasting Union’s Tech 3353-1 report defines the Television Lighting Consistency Index on a 0–100 scale. Its guidance associates scores above 85 with little or no camera correction. That is useful when background color must remain stable across multiple fixtures. Still, a high score cannot fix uneven exposure. Check the actual backdrop through the camera, especially near its edges.
Choose a fixture with controllable output, smooth dimming, and beam shaping suited to the studio’s width. Soft transitions help prevent hard shadows where the floor curves upward. Leave enough distance for the beam to blend, but watch for spill onto the subject. A light meter makes comparisons repeatable; a gray card can help check color balance. I would not trust one reading alone. Recheck after moving a stand, changing a lens, or replacing the backdrop, because the setup rarely stays perfectly identical.
China-made lighting for an even studio background often begins with broad, controllable sources. LED panels spread light across a wide area, making them useful for small rooms and paper backdrops. Bi-color models offer flexibility, but match the setting to your camera’s white balance. For larger backgrounds, COB LED fixtures with softboxes can deliver stronger, softer coverage. Position them to the sides and aim slightly past the backdrop. That reduces bright hotspots near the center.
Linear LED tubes can help light narrow backgrounds or add coverage along the edges. Some studios also use compact Fresnel-style LED lights when space is limited, though their focused beams need careful diffusion. Keep fixtures at similar distances and angles, then compare exposure across the backdrop with a camera or light meter. Small adjustments matter. A one-stop difference can make a pale wall look uneven. Check color rendering and flicker performance, especially when recording video at higher frame rates. Even with careful placement, wrinkles or reflective paint may still create uneven patches. The fixture alone cannot fix every surface.
China Top Lights for Seamless Studio Background Lighting?
Key Features to Compare When Choosing Background Lights
A seamless background begins with even illumination, not simply high wattage. Compare measured output at a fixed distance, then check the beam angle. A wide beam can cover more space, but it may spill onto the subject. Narrow beams create stronger hotspots. I have found that placing two lights at equal distances often produces cleaner results than using one powerful fixture. Measure both sides with a light meter when possible.
Color consistency matters during long studio sessions. Look for stable color temperature, dependable dimming, and high CRI or TLCI ratings. A light rated around 5600K should remain close to that value when dimmed. Some fixtures shift visibly warmer at low output. That can complicate skin tones and product colors. Flicker performance also deserves testing at the camera’s intended shutter speeds. Slow-motion footage reveals problems that normal monitoring may hide.
Heat, fan noise, mounting strength, and control options affect real production work. A quiet fixture is valuable for interviews, while efficient heat management protects small rooms from becoming uncomfortable. Check whether the light supports local controls, remote adjustment, or wired backup. My early setups focused too much on brightness and ignored spill control. That was a costly lesson. A simple barn door, grid, or flag may improve the background more than extra power. Always test the light with the actual backdrop, camera, and exposure settings. The result may differ from the specification sheet.
A shadow-free studio background starts with distance, not extra power. Place the subject at least six feet from the backdrop when space allows. This reduces hard shadows and helps keep the background evenly lit. Set the camera and subject position before adjusting the lights. Small changes in distance can shift the brightness across a plain wall or paper roll.
Use two lights aimed at the background, one on each side, and angle them slightly inward. Keep the beams off the subject. Add diffusion if the backdrop shows bright patches, then check it from the camera’s position. A light meter can help compare readings across the frame; without one, take a test photo and inspect the corners. Look closely. They often reveal uneven lighting first.
Set the background exposure independently from the subject, then adjust each light in small increments. Watch for spill on hair, shoulders, or clothing. A flag or carefully placed black card can block unwanted light. I have found that moving a light a few inches can work better than raising its output, though cramped rooms make this harder. Check the final setup with the subject in position, since an empty-frame test can hide shadows that appear once someone steps in.
Relative background illuminance decreases according to the inverse-square law: doubling the light-to-background distance reduces illuminance to one quarter. Keeping the subject several feet in front of the background and using evenly spaced top lights helps reduce visible shadows and brightness falloff.
Chart basis: Relative illuminance is normalized to 100% at 1 meter and calculated using the inverse-square relationship: illuminance is proportional to 1 ÷ distance².
China Top Lights for Seamless Studio Background Lighting?
How to Evaluate Quality, Compatibility, and Long-Term Value
A reliable background light should produce even illumination from edge to edge. Check color accuracy, flicker control, and brightness stability during a four-hour session. A high CRI rating helps, but it does not tell the whole story. Test skin tones, white surfaces, and colored backdrops with your own camera. Watch for green or magenta shifts. Small flaws become obvious in post-production.
Compatibility deserves equal attention. Confirm the light’s voltage range, mounting system, dimming method, and control protocol. A fixture may fit a standard stand but fail with your existing softbox. Check cable length, heat clearance, and fan noise before installation. I once overlooked a noisy cooling fan. It ruined quiet recording scenes. That mistake still influences my buying checklist. Always request test footage at several brightness levels.
Long-term value depends on more than the purchase price. Examine heat management, LED lifespan claims, warranty terms, spare-part access, and repair support. Ask whether replacement power supplies are available locally. Keep written records of brightness tests and color readings. They provide useful evidence after months of use. My own evaluations are not perfect; room reflections can distort results. A controlled test space is better. Still, practical testing reveals weaknesses that product sheets often hide.
| Evaluation Dimension | Reference Benchmark for a Professional Studio Light | Why It Matters for Seamless Backgrounds | Practical Verification Method | Long-Term Value Indicator | Suggested Weight |
|---|---|---|---|---|---|
| Color Rendering | CRI Ra ≥95 and TLCI ≥95; inspect individual R9 performance when red, skin-tone, or saturated background colors are used. | High color fidelity reduces hue shifts across the background and helps preserve accurate subject-to-background separation. | Review an independent test report or measure with a calibrated spectrometer. Do not rely only on a general CRI claim. | Consistent spectral output reduces color correction time and makes the light useful for both video and photography. | 15% |
| Color Consistency | Measured CCT should remain within approximately ±200 K of the selected setting across the usable dimming range; green-magenta shift should be minimal. | Stable color prevents visible gradients or mismatched tones when several fixtures illuminate one seamless sweep. | Measure the fixture at 100%, 75%, 50%, and 25% output, then compare the readings. | Stable calibration lowers the need to recalibrate fixtures after repeated use. | 12% |
| CCT Range | A practical bi-color range is about 2,700–6,500 K; a daylight fixture should be close to 5,600 K, while a tunable fixture should provide repeatable presets. | Matching the background light to daylight, tungsten, or mixed studio conditions improves workflow flexibility. | Verify the actual CCT at the minimum, middle, and maximum settings rather than checking the advertised range alone. | A broad, repeatable range can reduce the need to replace fixtures when production requirements change. | 8% |
| Flicker Performance | No visible banding or pulsing at the intended shutter speeds and frame rates; professional fixtures should remain stable through normal dimming. | Flicker can create rolling bands in video, especially at high frame rates or with electronic shutters. | Test at 24, 25, 30, 50, 60, 100, and 120 fps where relevant, using the actual camera and shutter settings. | Reliable flicker control avoids reshoots and keeps the fixture suitable for future high-speed production. | 12% |
| Output and Uniformity | Compare illuminance in lux at 1 m using the same modifier. For a seamless background, aim for no more than approximately 1/3 stop variation across the lit area. | Even illumination helps prevent hot spots, dark corners, and visible transitions on white or colored sweeps. | Take readings at the center, top, bottom, left, and right of the background using a light meter or calibrated lux meter. | Efficient, uniform output reduces the number of fixtures and the power required for a consistent result. | 14% |
| Beam and Modifier Compatibility | The fixture should support a controlled beam suitable for the space, with compatible softboxes, lanterns, reflectors, grids, or barndoors. | Control over spill prevents light from reaching walls, ceilings, or the subject when a clean background edge is required. | Check the mount interface, modifier availability, locking mechanism, and whether accessories remain secure during overhead use. | A widely supported mount makes future accessory replacement and system expansion easier. | 10% |
| Dimming Behavior | Smooth, repeatable dimming from approximately 100% down to at least 10%; lower levels should not introduce obvious color shifts or flicker. | Precise dimming allows the operator to balance foreground and background without moving the fixture. | Record output, CCT, and camera footage at 100%, 75%, 50%, 25%, and 10% output. | Predictable dimming reduces dependence on neutral-density material and saves setup time. | 7% |
| Noise and Thermal Management | For dialogue environments, a target of approximately 30 dBA or lower at 1 m is preferable; thermal protection should prevent unsafe overheating. | Fan noise can be recorded by microphones, while excessive heat may affect reliability and color stability. | Measure sound pressure in a quiet room and run the fixture at full output for at least 30–60 minutes. | Quiet, well-cooled operation supports longer service life and fewer interruptions during production. | 8% |
| Control and Integration | Local controls should be clear; professional installations commonly benefit from DMX512, wired control, or a dependable wireless control option. | Networked control makes it easier to match multiple background lights and repeat lighting setups. | Test addressing, signal stability, reset behavior, dimming response, and operation after power cycling. | Standard control protocols reduce dependence on a single control ecosystem. | 5% |
| Electrical Compatibility | For international studio use, a 100–240 V AC, 50/60 Hz input is practical when confirmed by the actual specification label and safety documentation. | Correct voltage compatibility reduces the need for transformers and lowers the risk of electrical problems during location work. | Check the input rating, connector type, cable length, power draw, grounding, and applicable safety certification. | Broad electrical compatibility improves portability and resale usefulness. | 4% |
| Mounting and Safety | Look for a secure yoke, locking adjustment points, rated mounting hardware, safety-cable provision, and a load capacity appropriate for the fixture and modifier. | Background lights are often positioned overhead or close to fabric, so mechanical security is essential. | Inspect the tilt lock, stand connection, safety point, housing, and modifier attachment under normal operating load. | Robust mechanical construction reduces downtime, accidental damage, and replacement costs. | 5% |
| Serviceability | Prefer accessible replacement parts such as power supplies, cables, fans, control boards, and LED modules where the design permits. | Studio fixtures may accumulate many operating hours, making repairability more valuable than a low initial price alone. | Request a parts list, repair procedure, expected availability period, and service turnaround information. | Repairable construction can extend useful life and reduce electronic waste. | 6% |
| Documentation and Warranty | A complete manual should include photometric data, input ratings, control instructions, safety guidance, and clearly stated warranty terms. | Reliable documentation makes installation, troubleshooting, and multi-fixture matching more predictable. | Check whether technical documents are available before purchase and whether warranty coverage includes the intended market. | Clear support conditions reduce ownership risk over the expected service period. | 4% |
| Overall Weighted Result | Interpretation | Recommended Action |
|---|---|---|
| 85–100 points | Strong candidate for demanding studio background work. | Confirm final output, modifier fit, noise level, and local service support before purchase. |
| 70–84 points | Usable for many productions, with one or more limitations to manage. | Test the fixture in the actual studio before committing to multiple units. |
| Below 70 points | Higher risk of color, flicker, compatibility, or ownership problems. | Request independent measurements or compare with a better-documented alternative. |
Reference values are evaluation benchmarks rather than claims about any specific product. Actual performance should be confirmed through independent measurements using the intended camera, frame rate, modifiers, mounting method, and studio power conditions.
Use two lights, one on each side, at equal distances. Compare readings across the backdrop or inspect a test photo. Check the corners.
Not always. Two lights can create more even coverage. I once focused too much on brightness and overlooked spill.
Aim for at least six feet when space allows. This helps reduce hard shadows behind the subject.
Angle the beams toward the backdrop, not the person. Use a flag, black card, grid, or barn door to block stray light.
Compare measured output at a fixed distance and review the beam angle. Wide beams cover more area but can spill; narrow beams may create hotspots.
Stable color temperature helps keep skin and product colors consistent. Test dimming and flicker at your camera’s planned shutter speeds. Slow motion can reveal issues.
Take a test photo from the camera’s position and inspect the corners. They often show uneven patches first.
Test with the actual backdrop, camera settings, and subject in place. An empty-frame test can miss shadows that appear later. Small rooms make adjustments harder.
Choosing the right lights for seamless studio backgrounds starts with understanding how brightness, beam spread, color consistency, and control affect the surface behind a subject. China-made options may include LED panels, COB lights with softboxes, strip lights, and dedicated background fixtures. Compare their output, dimming range, color quality, heat management, mounting options, and compatibility with your camera and power setup. A suitable fixture should provide even illumination across the background without distracting hotspots or color shifts.
A thoughtful setup matters as much as the equipment. Position lights to cover the background evenly, adjust their distance and angle, and use diffusion or flags to control spill onto the subject. Check the result across the full frame, then fine-tune brightness and placement to reduce shadows and gradients. For photographers working with limited space, knowing how to achieve seamless background lighting in a small studio means balancing fixture size, light spread, and subject-to-background distance. Finally, assess build quality, practical compatibility, and expected lifespan to choose a reliable solution with lasting value.
