How to Set Up Three Point Lighting for YouTube Videos?

Time:2026-06-27 Author:Charlotte
0%

Lighting plays a crucial role in video production. For YouTubers, it can elevate the quality of your content. Many creators ask how to set up three point lighting for YouTube videos. This technique is not just for professionals; it’s accessible to anyone.

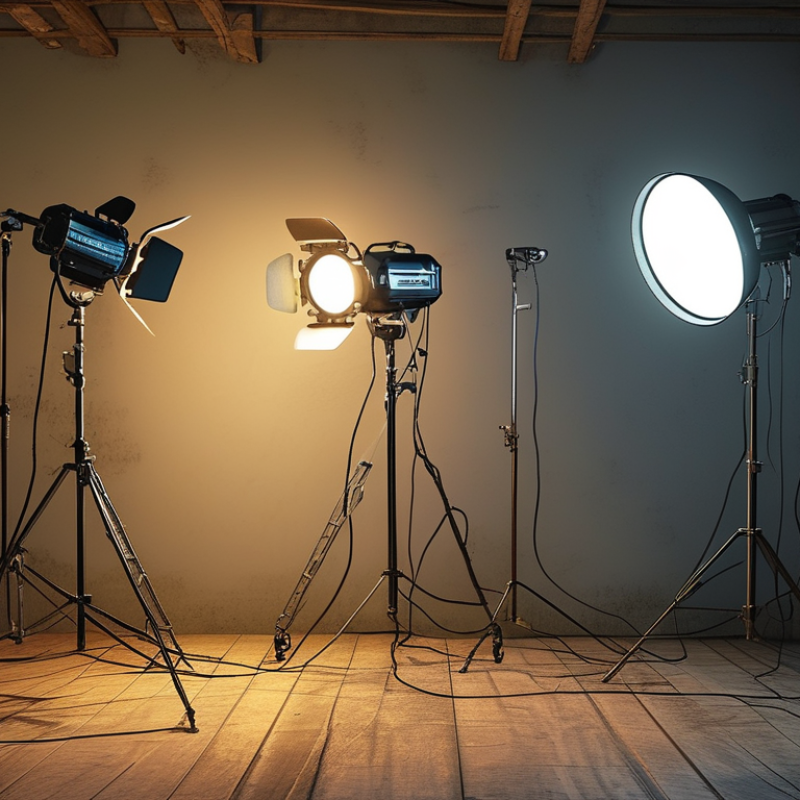
Three point lighting involves three light sources: key light, fill light, and backlight. This setup enhances depth and minimizes harsh shadows. A well-lit video captures attention and engages viewers, making your content more appealing. However, it can be challenging to master. You might find your lights create unexpected shadows or glare. Seeking balance among the three lights is key.

Getting it right takes practice and experimentation. Adjusting angles, intensities, and distances can transform your videos. Sometimes, the simplest setup can produce stunning results. Remember, learning from imperfections is part of the process. Embrace the journey to discover what works best for you.

How to Set Up Three Point Lighting for YouTube Videos?

Choosing the Right Location for Three Point Lighting Setup

Choosing the right location for your three-point lighting setup is crucial. An ideal setting can significantly enhance your video quality. Look for an area where you have access to natural light. A large window can serve as a useful source. Positioning your subject near this window gives a soft, flattering light.

Choose a space free from distractions. Cluttered backgrounds can divert attention. Find a clean wall or a simple backdrop to keep focus on your subject. Check the location at different times of the day. Shadows may change as the sun moves. That could lead to uneven lighting.

Consider the height of your lights. Position your key light slightly above eye level. This creates natural shadows that add depth. Your fill light should be softer, reducing harsh shadows. Experiment to see what looks best on camera. Sometimes, unexpected adjustments can lead to unique results that enhance your video. Remember, practice makes perfect.

Understanding the Three Key Light Sources: Key, Fill, and Backlight

When setting up a three-point lighting system for YouTube videos, understanding the three key light sources is crucial. The three sources are the key light, fill light, and backlight. Each serves a unique purpose that enhances video quality. According to a survey by the creators of "Video Marketing Statistics," more than 80% of marketers believe video boosts viewer engagement.

The key light is your primary source. It should be the brightest and positioned at an angle to create depth. A hard light can enhance facial features but can also create harsh shadows. Use diffusers to soften the light. In contrast, the fill light helps reduce those shadows and adds a balanced tone. This light should be softer, illuminating the darker side of the subject’s face. Studies indicate that videos with balanced lighting result in a 50% higher viewer retention rate.

Backlight adds dimension and separates the subject from the background. This light creates a contour around the subject, making the video visually appealing. However, poorly placed backlighting can lead to unwanted glare. When utilizing a three-point lighting setup, adjustments might be necessary. Regularly review how shadows fall and ensure they contribute positively to your content. Lighting mistakes often stem from misunderstanding the dimensions of your environment. Constantly experiment for the best outcome.

Setting Up the Key Light: Positioning and Angles for Optimal Illumination

Setting up your key light properly can greatly enhance your YouTube videos. The position and angle of the key light play crucial roles in achieving the right illumination. Ideally, the key light should be placed at a 45-degree angle from your face. This angle provides dimension and depth, which makes your appearance more engaging on camera. A common mistake is lighting the subject from directly in front, leading to flat, uninteresting visuals.

Adjust the height of your key light to ensure it aligns with your eye level. This creates a natural look and avoids harsh shadows. Experimenting with distance helps you find the perfect balance. Too far away and your light loses impact; too close, and the lighting may become overwhelming. It’s crucial to adjust the intensity as well. Bright lights can wash out features, while too dim can result in a dull appearance. Testing different setups will give you insight into what works best for your specific environment.

Reflecting on your setup is essential. Take time to evaluate how shadows fall on your face. Adjust angles and positions to minimize any unwanted shadows. Investing time in tweaking these elements will pay off in your video quality. Each creator's journey is unique, and finding the right key light setup might take several attempts. Keep experimenting until you feel satisfied with the results.

Utilizing Fill Light to Balance Shadows and Enhance Visual Appeal

When setting up a three-point lighting system, the fill light plays a crucial role in enhancing the overall visual appeal of your YouTube videos. It serves to soften shadows created by the key light, resulting in a more polished look. Position the fill light at a lower intensity to prevent blinding brightness in the frame. This balance between key and fill light can dramatically alter the viewer’s perception of your content.

For effective shadow management, consider the distance of the fill light from your subject. A closer fill light will provide a softer shadow, while a more distant one can lead to harsh contrasts. Experiment with different angles; sometimes, the fill light might need to be adjusted for angles that highlight your features better. The goal is to create an inviting atmosphere that keeps viewers engaged.

Remember, imperfections can be a part of the learning curve. Don’t hesitate to play around with different setups. This process may lead to surprising results. Let a less-than-perfect setup inspire further creativity. Adjustments may take time, but each trial teaches valuable lessons. Ultimately, balance is key to successful lighting.

Adding the Backlight: Creating Depth and Separation from the Background

Creating depth and separation in your YouTube videos goes beyond a basic three-point lighting setup. Adding a backlight is vital for achieving a professional look. The backlight, often positioned behind the subject, helps to outline them against the background. This technique enhances visual interest and can be crucial for storytelling.

Statistics reveal that 80% of viewers are more engaged with videos that have effective lighting. Good lighting can improve viewer retention by 50%. Backlighting adds a subtle halo effect around the subject, which can elevate the overall aesthetic. This effect fosters a visual hierarchy that makes the subject pop in the frame. However, it requires careful placement and intensity adjustments. An overly harsh backlight can create distracting shadows.

Experimenting with the distance and brightness of the backlight is essential. Find a balance that complements your subject without overwhelming them. Professional content creators often recommend testing different setups before finalizing your lighting arrangement. Remember, not every attempt will yield perfect results. Your journey towards mastering lighting is a continuous learning experience.

Three Point Lighting Setup for YouTube Videos

FAQS

: Why is the location important for three-point lighting?

: The right location enhances video quality. Natural light from a window is beneficial.

What type of backdrop should I use?

Choose a clean wall or simple backdrop. Avoid clutter to keep focus on the subject.

How does the time of day affect lighting?

Light changes throughout the day. Shadows can alter, creating uneven lighting.

Where should I position my key light?

Place the key light at a 45-degree angle from your face. This adds dimension.

What is the ideal height for the key light?

Align the key light with your eye level. This prevents harsh shadows on your face.

How can I avoid flat visuals?

Avoid lighting directly from the front. This can create dull and uninteresting visuals.

Why add a backlight to my setup?

A backlight creates depth. It outlines your subject and improves visual interest.

What should I consider when adjusting the backlight?

Adjust its distance and brightness carefully. An overly harsh backlight can create distractions.

How do I know my lighting setup is effective?

Reflect on how shadows fall on your face. Adjust as needed to improve appearance.

Is experimentation important in lighting setups?

Yes, experimenting is crucial. Not every attempt will be perfect, but it aids learning.

Conclusion

When learning how to set up three point lighting for YouTube videos, it's essential to start by choosing the right location that maximizes lighting effectiveness. The setup involves three key light sources: the key light, fill light, and backlight, each serving a distinct purpose in enhancing your video’s visual quality.

The key light acts as the main source of illumination, and it should be strategically positioned and angled to provide optimal lighting on the subject. The fill light complements the key light by reducing harsh shadows and ensuring a balanced look. Finally, the backlight creates depth and separates the subject from the background, adding an extra dimension to the video. By mastering these elements, you can significantly improve the production quality of your YouTube content.

Charlotte

Charlotte

Charlotte is a seasoned marketing professional with a deep understanding of the company's portfolio and a passion for elevating its presence in the market. With a keen eye for detail and a commitment to excellence, she ensures that our professional blog is regularly updated with insightful articles......