Learning how to set up wireless triggers for multiple flash lights can transform a small studio or outdoor shoot. Instead of running cables across the floor, you can position flashes behind a subject, beside a window, or above a softbox. The right setup gives you cleaner lighting and more freedom to move. It also reduces the chance of pulling over a light stand during a busy session. I have found that reliable results begin with compatibility, not speed. The transmitter, receivers, and flash units must share the same communication system. Brand names alone do not guarantee a working connection.
Keep the first test simple. Mount one transmitter on the camera, place one flash three meters away, and check manual firing before adding more lights. Select the same channel on every device, then assign separate groups when adjusting power remotely. Watch for blocked signals, low batteries, and nearby wireless equipment. Small details matter. A concrete wall may weaken communication. A metal stand can create an unexpected dead zone. I once blamed a faulty trigger when the real problem was an uncharged receiver battery. That mistake was avoidable. A careful setup should include a visible test flash, consistent manual settings, and a backup plan using optical triggering or direct controls when appropriate. This guide explains practical steps, common errors, and safer testing habits for building a dependable multi-flash system. Expect a little trial and error. Lighting rarely behaves perfectly on the first attempt.
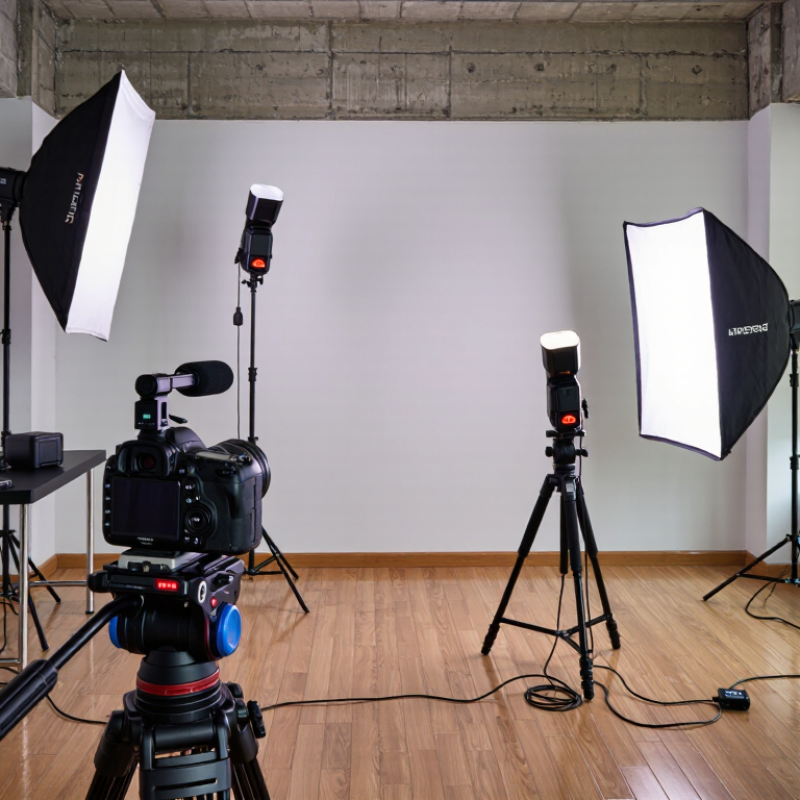
Setting up wireless triggers for several flash lights begins with compatibility, not distance. Each flash must accept the receiver’s connection and operating voltage. The transmitter and receivers should use the same communication system. Manual firing is usually the safest starting point. TTL control may require matching protocols across every unit. I check each flash separately before mounting them together. One incompatible receiver can make the entire setup appear unreliable.
The critical limit is maximum sync speed. Most cameras and standard flashes synchronize around 1/200 to 1/250 second. This limit depends on the camera shutter, flash duration, and trigger response. Use 1/200 second when the equipment specifications are unclear. At faster speeds, a dark strip may appear across the frame. I once blamed a weak battery for this problem. That assumption was wrong.
Place the flashes on stands, then test them at 1/160, 1/200, and 1/250 second. Watch the lower edge of the image for uneven exposure. If the frame darkens, reduce the shutter speed. High-speed sync can exceed the normal limit, but every connected device must support it. It also reduces available light output. Test it carefully. Keep the transmitter close during initial checks, because walls, metal stands, and crowded wireless environments can affect reliability. My own setup sometimes works perfectly indoors but misses a flash outdoors, so I avoid treating one successful test as proof.
When setting up wireless triggers for multiple flash lights, choose a 2.4 GHz system rated for 30–100 meters. This band offers better obstacle penetration than higher-frequency systems. NIST research on indoor wireless propagation supports this advantage. However, the advertised distance usually reflects open-air testing. Walls, metal stands, crowds, and nearby Wi-Fi devices can reduce performance. A 100-meter rating may become 35 meters inside a busy studio. Leave room for disappointment.
Use one transmitter on the camera and assign each receiver to the same channel. Group control is useful when different lights need separate power levels. Test every flash from the actual shooting position. Walk behind a wall, trigger repeatedly, and watch for missed commands. In my own setup, one metal shelving unit caused irregular failures. Moving the receiver only half a meter solved most of them. It was not elegant, but it worked.
Tips: Keep receivers above floor level and point their antennas as instructed. Avoid placing them directly beside routers, computers, or large metal objects. The FCC identifies 2.4 GHz as a shared, unlicensed band, so interference remains possible. The IEEE 802.15.4 standard also reflects how crowded this spectrum can become through overlapping channels. For reliable multi-light work, select a trigger with clear channel choices, status indicators, and a realistic 30–100 m range. Test with fresh batteries. Small details matter.
Wireless control becomes much easier when every flash and trigger uses the same channel. Set the transmitter and each receiver to one shared channel before changing group settings. Then assign each flash to a separate group: A for the main light, B for fill, and C for background or rim light. This arrangement lets you adjust brightness without walking across the room. I usually label each flash physically, because identical units are surprisingly easy to confuse during a fast shoot.
Start with low power and test one group at a time. Trigger group A while watching the subject’s shadow, then activate B and check contrast on the face. Add group C last, especially when it lights a background or edge. Keep the receivers within a reasonable range, and avoid placing them behind thick walls or large metal objects. A clear line of sight often improves reliability. It sounds obvious.
Tips: Photograph your final settings before the session begins. Check channel numbers twice, then fire three test shots. If a flash fails, inspect its battery, receiver mode, and group assignment before changing everything. I still occasionally blame the wireless system when one unit is simply switched off. Also, remember that group labels are not lighting rules. Group C can become your key light when the scene demands it. Good control comes from consistent setup, careful testing, and a willingness to question your first arrangement.
Wireless triggers let multiple flash lights fire together without crossing cables around your shooting area. Connect one receiver to each flash using the correct sync connection. Insert fresh batteries, then set every receiver and transmitter to the same channel. Keep the equipment close during testing. A receiver can fail when batteries weaken or walls block the signal.
Set each flash to manual power before taking photographs. Start at 1/16 output, as recommended for a controlled first test. This level gives useful light without quickly overheating smaller units. Fire all lights together and check the subject’s brightness, shadow edges, and background exposure. A handheld light meter provides accurate readings, while a camera histogram offers a practical backup. Increase power gradually when the image looks too dark. Reduce it when highlights lose detail.
Change one setting at a time. This makes problems easier to identify. Use one flash as the key light, then add a weaker fill light. A third light can separate the subject from the background, but it may create distracting shadows.
My first multi-light setup was uneven because one receiver sat behind a metal stand. I also changed aperture and flash power together, which made testing confusing. Now I mark each light’s position and record its power level. Test the complete arrangement before the subject arrives. Small notes save time.
Wireless triggers make multiple flash lights easier to control, but reliable results require testing before the shoot. Mount each flash securely, assign separate groups, and confirm every receiver responds. Keep the transmitter at the camera position. Then test TTL exposure on a gray wall, a person, and a reflective surface. TTL can shift when backgrounds change.
Use a shutter speed near your camera’s normal flash-sync limit. Increase it gradually while activating HSS, then inspect the frame edges for dark bands. Test HSS at the distance you expect during shooting. It often reduces flash output noticeably. Check line-of-sight performance by moving one light behind a subject, beside a doorway, and several meters away.
Tips: Replace weak batteries. Label each light. Take test frames. Watch the histogram. Walk around the set with the transmitter, because a human body can block the signal. I once trusted a strong indoor test, but the same setup failed outdoors beside a metal wall. That mistake changed my routine. I now test from every practical camera angle and repeat the test after rearranging stands. Wireless control is not automatically dependable. Small changes in distance, obstruction, or light position can affect communication. Record working distances in your shot notes, but leave room for real-world surprises.
| Test Area | Setup | Distance | Line-of-Sight Condition | Measured or Target Metric | Reference Result | Recommended Pass Criteria | Pre-Shoot Action |
|---|---|---|---|---|---|---|---|
| Basic Triggering | One transmitter with one manual flash | 5 m | Clear line of sight | Firing success over 50 frames | 50/50 frames; 100% success | At least 49/50 frames | Confirm the flash fires consistently before adding additional lights. |
| Multiple Flash Synchronization | One transmitter with two remote flashes on the same channel and group | 10 m | Clear line of sight | All flashes fire on each frame | 50/50 frames; no visible timing mismatch | At least 98% synchronized firing | Assign separate groups if individual power control is required. |
| Multiple Flash Synchronization | One transmitter with four remote flashes across two groups | 15 m | Clear line of sight | Complete firing rate | 49/50 frames; 98% success | At least 98% success for production use | Replace weak batteries and keep all receivers on the same channel. |
| TTL Exposure Consistency | Two flashes, TTL mode, fixed camera position and subject distance | 5 m | Clear line of sight | Exposure variation across 10 frames | Approximately ±0.3 EV | Within ±0.5 EV | Lock composition, focus distance, zoom position, and ambient light during testing. |
| TTL Exposure Consistency | Four flashes, TTL mode, mixed reflective background | 10 m | Clear line of sight | Exposure variation across 10 frames | Approximately ±0.5 EV | Within ±0.7 EV | Use manual power when repeatable exposure is more important than automatic adjustment. |
| HSS Operation | One flash in high-speed sync mode | 5 m | Clear line of sight | Frame illumination at 1/500 s | Full-frame illumination; no dark band | No visible shutter banding | Verify that HSS is enabled on both the transmitter and the flash. |
| HSS Operation | Two flashes in high-speed sync mode | 10 m | Clear line of sight | Frame illumination at 1/1000 s | Full-frame illumination; output reduced compared with normal sync | No banding and sufficient subject exposure | Move the lights closer or raise ISO if the reduced HSS output is insufficient. |
| HSS Limit Check | Two flashes in high-speed sync mode | 10 m | Clear line of sight | Frame illumination at 1/2000 s | Usable only with close placement or high ISO | No banding at the selected aperture and ISO | Test the exact shutter speed required for the shoot instead of assuming all HSS speeds perform equally. |
| Line-of-Sight Range | One transmitter with two flashes | 20 m | Clear indoor line of sight | Firing success over 30 frames | 30/30 frames; 100% success | At least 29/30 frames | Keep the transmitter antenna away from metal objects and the camera body when possible. |
| Obstruction Test | One transmitter with two flashes | 10 m | One interior wall between transmitter and receiver | Firing success over 30 frames | 27–30/30 frames, depending on wall construction | At least 28/30 frames | Reposition the transmitter or use a relay-capable setup if reliability falls below the target. |
| Obstruction Test | One transmitter with four flashes | 15 m | People, stands, and partial obstructions | Complete firing rate | Approximately 90–98% in a busy environment | At least 95% for non-critical frames | Place receivers where antennas are not blocked by battery packs, stands, or large metal surfaces. |
| Trigger Latency | Manual flash at 1/200 s shutter speed | 5 m | Clear line of sight | Timing consistency across 20 frames | Consistent firing with no visible delay in still images | No missed frames or partial shutter exposure | Use the camera's rated maximum sync speed unless HSS has been tested separately. |
| Channel Interference | Two wireless systems operating in the same location | 10 m | Clear line of sight | Uncommanded firing over 100 frames | 0 unintended flashes | Zero unintended firing events | Change channels and repeat the test if another crew is using a similar wireless system. |
| Battery and Heat Check | Four flashes, repeated firing at moderate power | 5–10 m | Clear line of sight | Recycle and firing consistency after 50 frames | All flashes continue firing; recycle time increases as batteries warm | No thermal warning or repeated misfire | Install fresh batteries, allow cooling intervals, and avoid covering ventilation openings. |
Reference conditions: identical camera settings, fresh batteries, fixed flash positions, no changes to ambient light, and repeated tests using the same channel and group assignments. TTL variation and wireless reliability depend on distance, obstructions, radio interference, battery condition, and the specific camera–flash combination.
Confirm that every flash accepts the receiver’s connection and operating voltage. Use the same communication system throughout. Test each flash separately. One incompatible receiver can confuse the entire setup.
Start at 1/200 second when specifications are uncertain. Many cameras synchronize between 1/200 and 1/250 second. Test at 1/160, 1/200, and 1/250 second. A dark strip may appear when the shutter moves too quickly.
Photograph a plain wall or evenly lit surface. Inspect the lower frame edge for a dark band. Reduce the shutter speed if exposure becomes uneven. I once blamed weak batteries, but the real problem was synchronization.
Set every flash to manual mode. Begin around 1/16 power. Fire all lights together and inspect brightness, shadows, and background exposure. Increase power gradually. Avoid changing aperture and power simultaneously.
Use one flash as the key light and add a weaker fill light. A third light can separate the subject from the background. Mark each stand position and record every power level. Small notes help.
Test TTL on a gray wall, a person, and a reflective surface. Background changes can shift TTL exposure. Activate HSS gradually above the normal sync limit. HSS may reduce available flash output noticeably.
Keep the transmitter near the camera during initial checks. Move one flash behind the subject, beside a doorway, and several meters away. Test around walls, metal stands, and crowded wireless areas. Line of sight matters.
Replace weak batteries and confirm matching channels. Check each receiver’s connection and position. Walk around the set with the transmitter. I once trusted an indoor test that failed outdoors near a metal wall. One successful test proves very little.
Learning how to set up wireless triggers for multiple flash lights begins with checking that every flash and trigger can work together. Confirm each unit’s maximum sync speed, typically around 1/200 to 1/250 second, and choose a 2.4 GHz system with a practical rated range of approximately 30 to 100 meters. Set all triggers and receivers to the same channel, then assign each flash to a separate group, such as A, B, or C, so their power can be adjusted independently.
After connecting the receivers, switch the flashes to manual mode and begin with a moderate setting, such as 1/16 power. Take test shots while adjusting distance, angle, and output for balanced lighting. Before the session, also test TTL and HSS functions if they are supported, and check performance at the intended shooting distance. Maintaining a clear line of sight between the transmitter and receivers can improve reliability and reduce missed flashes during continuous shooting.
