A well-placed hair light adds separation and shape without making a portrait look theatrical. The goal is not to create a bright outline. It is to reveal strands and shoulders while keeping attention on the face. In this guide, you’ll learn how to position hair light for portrait photography, with practical adjustments for different hair lengths, backgrounds, and lighting setups.
Start with the light behind and slightly to one side of your subject, then raise it until it skims the hair. A small softbox or gridded reflector can help control spill onto the face and lens. Watch the background, too. Dark hair may disappear against a dark wall, while a strong rim can turn blonde hair into a glowing patch. Small changes matter. Move the stand a few inches, check the camera view, and adjust the power before changing everything at once.
There is no single perfect angle. Hair texture, subject height, and room size all affect the result. I’ve found that a setup that looks balanced to the eye can appear harsh in a test frame. That is worth remembering. Use the camera preview, look for clipped highlights, and ask your subject to turn slightly if the light catches unevenly. Keep the stand secure and cables out of the walking path. The sections ahead explain how to refine placement, control brightness, and solve common problems while keeping the portrait natural.
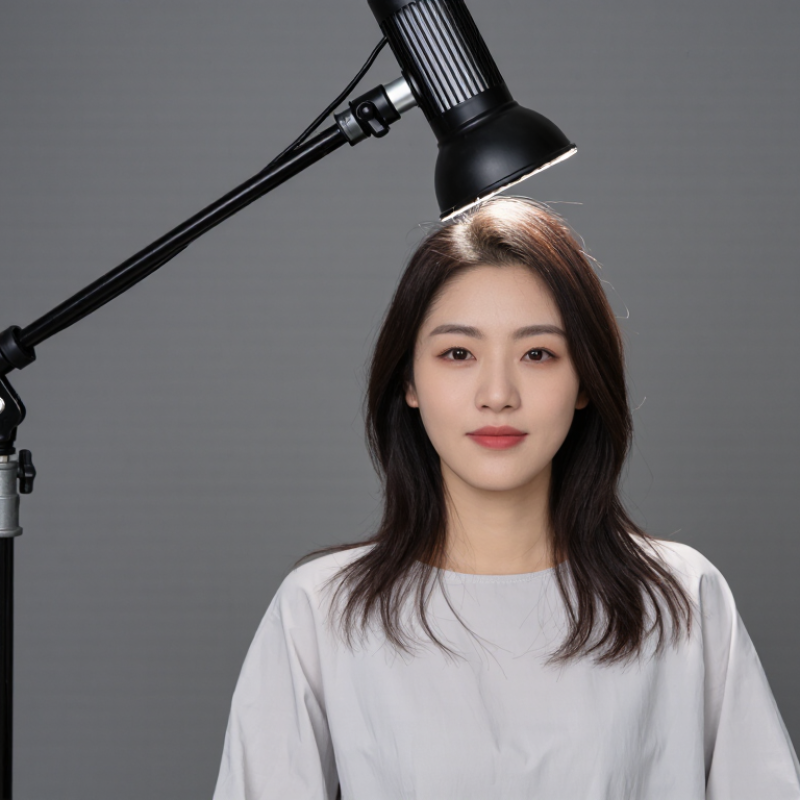
Determine the Hair Light’s Purpose and Effect
A hair light should serve a clear purpose: separating the subject from the background, revealing hair texture, or adding a deliberate edge of brightness. Decide which effect matters before moving the light. For separation, place it behind the subject and slightly to one side, aiming toward the hair rather than the camera. A narrow highlight can outline dark curls against a shadowy backdrop. On pale hair, the same output may erase detail and look harsh. Subtle is often stronger.
Watch the light on the shoulders and face, too. If it spills across the cheek, adjust its angle or use a grid or flag to control the beam. Raise or lower the source until it catches the crown without creating a bright stripe. Then check the result at the shooting exposure, not only in the modeling light. A small shift can change the effect more than expected. There is no fixed placement that suits every head shape or background; even a careful setup may need a second adjustment. Keep individual strands visible, and reduce power if highlights lose their texture.
How to Position Hair Light for Portrait Photography?
Determine the Hair Light’s Purpose and Effect
Use these exposure levels as creative starting points, not fixed rules. A lower output can add subtle separation, while a higher output creates a more pronounced rim. Position the light behind and above the subject, then adjust its angle and power to suit the hair, background, and desired effect.
Choose a Light Source and Modifier
Choose a source with stable color and enough output to separate hair from the background without overpowering the key light. For still portraits, a flash head offers brief, repeatable bursts; continuous light makes placement and spill easier to judge in real time. Check the manufacturer’s spectral data when available, then test it on the subject’s actual hair. CIE Publication 13.3-1995 calculates general color rendering (Ra) from eight test colors. Since that average does not include saturated red, also inspect skin and warm highlights rather than trusting one number. Small differences matter.
Match the modifier to the hair’s texture and the look you want. A gridded strip softbox creates a narrow, controlled ribbon of light along curls or straight strands. A reflector produces a crisper edge, but can reveal flyaways and scalp shine. Feather the light across the hair, then adjust its height until highlights trace the shape instead of forming a bright patch. Keep it out of the lens. A flag can help. I would not treat the grid as a cure-all: dense curls may need a broader source, while fine hair can disappear under soft, low-contrast light. Shoot a test frame, zoom in, and lower the output if individual strands lose detail.
How to Position Hair Light for Portrait Photography? - Choose a Light Source and Modifier
| Light source |
Modifier |
Starting position |
Hair-light effect |
Best suited to |
Watch for |
| Strobe or flash |
Stripbox with grid |
Behind the subject, slightly to one side; angle down toward the crown and rear edge of the hair. Start above head height. |
A controlled, narrow highlight along one side of the hair. |
Studio portraits where spill onto the face or background should be limited. |
Check that the beam does not point into the lens. A grid helps limit spread but does not eliminate flare. |
| Strobe or flash |
Reflector dish with grid |
Place high and behind the subject, aimed at the top and back of the head; feather the beam away from the face. |
A more defined, concentrated rim or crown highlight. |
Dramatic portraits and situations calling for a crisp edge of light. |
The smaller, more direct source can create bright hotspots. Reduce output or increase distance if highlights clip. |
| Strobe or flash |
Softbox without a grid |
Position behind and above the subject, then aim across the hair rather than directly at the face. |
A broader, softer highlight with a gradual transition. |
Gentle portraits or hair that benefits from less sharply defined highlights. |
The larger spread can brighten the background or cause flare; use flags or reposition the light if needed. |
| Continuous LED |
Strip softbox, optionally gridded |
Start behind and above the subject, then adjust while watching the highlight in the camera preview. |
A visible, adjustable edge highlight that can be assessed before shooting. |
Portrait sessions where seeing the light effect in real time is useful. |
Continuous output may be less powerful than flash in bright conditions. Check exposure and keep the stand secure. |
| Window or other natural light |
Window edge; optional reflector opposite |
Turn the subject so the window is behind and to one side, allowing light to skim the hair. |
A natural-looking highlight whose softness depends on the window size and sky conditions. |
Available-light portraits and simple setups without a dedicated hair light. |
The light can change with weather and time of day. Use a reflector carefully to avoid flattening the hair highlight. |
Setup note: These positions are starting points, not fixed measurements. Take a test frame, check the hair highlights and background, then adjust the light angle, distance, and output. Keep the light stand stable and avoid directing bare light into the subject’s eyes.
Position the Light Behind and Above the Subject
For a clean hair light, place the source behind and above your subject, then aim it toward the back of the head and shoulders. A position around 45 degrees behind the subject is a useful starting point, not a fixed rule. Raise the light enough to keep its stand out of the frame, and angle it down so the beam skims the hair. Watch the edges of the hair as you adjust. You want a clear rim, not a bright stripe across the face.
Tips: Use a grid or flag to limit spill onto the lens and background. Start with low power, then increase it gradually. Check a test frame at the camera’s normal viewing size.
Dark hair may need more light to separate from a dark background, while pale hair can look harsh quickly. Move the source farther away or reduce its power if highlights lose texture. A small change in height can also shift the rim from the crown to the shoulders. In practice, the first placement is often a little too high. Review the image, not just the light meter, and adjust until individual strands remain visible without drawing attention away from the face.
Aim and Shape the Beam to Highlight the Hair
Place the hair light behind and slightly above your subject, aiming it toward the crown and the outer edges of the hair. A starting angle of about 45 degrees often creates a clean rim without shining directly into the lens. Keep the light just outside the frame. Small changes matter. Rotate the head a few degrees and watch where the highlight falls; a narrow line can define curls, while a broader beam reveals texture across longer hair. I sometimes set the light too high, then wonder why the crown looks flat.
Shape the beam to suit the hairstyle and background. A grid or barn doors can keep light off the face and backdrop, while a strip-shaped source produces a controlled, vertical highlight. Watch the edges. If light spills across the cheek or creates a bright patch behind the head, adjust the angle or flag the source with black material. Check exposure on both dark and light hair: dark strands may need a little more separation, while pale hair can lose detail quickly. Review a test frame at full size. A highlight that looks elegant on the camera screen may become a harsh white streak. Don’t chase perfect symmetry; a small uneven edge can feel more natural.
Adjust Power and Check for Spill on the Face and Background
Aim the hair light at the crown and upper shoulders, not straight toward the lens. Start with its output about one stop below the key light, then check a test frame. This is only a starting point; dark hair may need more separation, while fine, light hair can show harsh highlights quickly. The IES Lighting Handbook describes the inverse-square behavior of a point source: doubling its distance reduces illuminance to roughly one-quarter, or two stops. Move the light farther away to soften uneven brightness, then raise its power if needed.
Check spill on the face and background, not just the hair. Turn the subject’s face slightly toward the key and inspect the forehead, cheek, and nose for stray highlights. A flag or grid can narrow the beam; small changes in angle often matter more than adding power. Use an incident meter for repeatable readings, or compare test frames at fixed exposure. Watch the background near the subject’s head for a bright patch. It can look like a halo.
Review at full size. Hair strands may clip before the overall image looks too bright. If the rim appears hard, reduce output or feather the light past the head. A little spill can be useful, though. Overcorrecting may leave dark hair merging into the background. Even a careful setup can miss a reflective cheek until the subject turns.
Conclusion
Learning how to position hair light for portrait photography begins with understanding its purpose: to separate the subject from the background and bring out the texture, shape, and shine of the hair. Choose a light source and modifier that suit the desired effect, from a soft, subtle rim to a more defined highlight. Place the light behind and slightly above the subject, then angle it toward the hair rather than directly at the camera.
Shape the beam carefully so it illuminates the hair without creating harsh hotspots. Adjust the light’s power while checking how it affects the face and background; unwanted spill can distract from the portrait or create uneven exposure. Small changes to the height, angle, and distance can make a noticeable difference, so review the result and refine the setup until the hair is clearly defined while the overall lighting remains balanced.
 Alterra Lighting